
Here are the lines written by a 15 year school girl. It indeed reminds us of our long forgotten nature and provokes us to again ponder on our actions.
Mother Nature
The lap of soothing comforts for all
With selfless care for all
Where all worries vanish, with no blemish,
Where the delicate colours of the rainbow,
Stretch themselves in the sky,
Birds sing, high and higher they fly.
Trees bear sweet fruits of affection,
Rivers linger through cresses with anticipation
This, nature through its humble phase,
confers on man a graceful place.
Man today in his passionate greed,
cutting down trees without need,
The smoke looming high from chimneys,
Toxicants thrown into rivers by industries.
Exploring, exploiting, denuding, eroding...
Man is gradually destroying his own living.
Benumbing, choking the Mother Nature.
Forgetting all her cares and nurture.
Tomorrow someone will surely ask:
Who is Mother Nature?
The barren lands with no life?
Or the carcasses of early extinct animals?
Is it???
So, can't we be kinder to nature,
for all her care and nurture?
can't we strive today,
So that never comes this tomorrow.
So that Mother Nature never cease to grow.
Can't We???
--Anjali Sharma
( fortunately, who is my beloved sis )
Saturday, August 22, 2009
Mother Nature
GIMP (the GNU Image Manipulation Program) my favourite Open-Source Image Editor
This tutorial is meant to remove fears from the hearts of people who fear working on open-source tools. GIMP is an open-source Image manipulation tool used exhaustively, but not that much common with the students especially here at my college. It has an exhaustive set of tools to match any of your image editing needs, with and extremely intuitive interface and very easy to learn.

Here are the easy steps to create one-
1. Install and start GIMP editor in your favourite operating system. This is fairly easy in case of OpenSolaris and Linux flavours like Ubuntu, Fedora etc.
2. File -> New -> Choose desired size ( default 640*400 works fine for me ), and click OK
Now a white background is visible in the Image window.

3. Select Blend Tool and Gradient as FG to BG. Then keeping the CTRL key pressed drag a line from top to bottom on the image and you shall find something like this -->
4. Select the Text tool from Toolbar or press 'T' key shortcut. and drag a bounding rectangle on the image at the position you want to place the text. This will open a text box popup, type in the de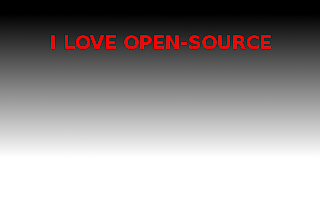 sired text here ( "I LOVE OPEN-SOURCE" in my case ). Check the "Use selected Font" option and select the desired font type ( Sans Bold in my case), size( 37 px in my case) and color ( Red in my case) from the drop down menu. This will create a new layer ( say Layer1 ), which will be listed in the Layers window and It will look like this now-->
5. Right click on the newly created layer with the name same as your text and select Duplicate Layer . This creates a duplicated layer ( say Layer2). Now with the original layer, Layer1 selected, go to
Filters -> Blur -> Gaussian Blur -> Select horizontal and vertical blur radius as anything between 12 px - 20px each. and click OK
6. Select Layer2 and choose Color as Green from the color chooser.
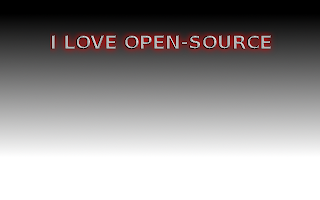
7. Select Filters-> Distorts -> Emboss -> select funtion as Emboss and Azimuth, Elevation and Depth to any suitable value ( 30, 45, 20 respectively in my case)
now this will look something like this->
8. Select Layer2 -> right click on it -> Duplicate Layer. This creates another duplicate layer of it ( say Layer3).
9. Now Select Layer3 -> Tools menu -> Transform Tools -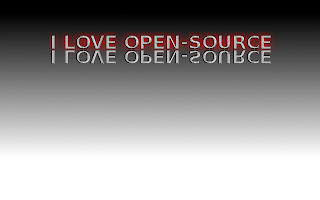 > Flip Tool -> Select Flip type as Vertical and click on the text. This is invert the image.
Select the Move tool from the toolbar and position the vertically flipped text few pixels below the original text. It will look like this now--->
10. Select Layer3 -> right click on it -> Add Layer Mask -> select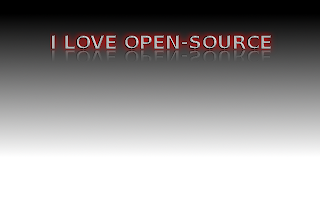 Transfer Layer's Alpha Channel -> click Add
11. Select Layer3 and then select Blend tool from the tool bar with Gradient as FG to transparent and using CTRL key draw a straight line from bottom to top anywhere in the image. This is make the reflection text only partially visible, like this->
12. Finally right click Layer3 -> Apply Layer Mask. This finishes our steps and we finally get the desired text, kept on a shiny table, and glowing in red light. Crop the image to remove unwanted space and thats all!

Hope you enjoyed the tutorial! Experiment and learn...
So lets get started. Here I present my first tutorial for building a cool name template with shiny table effect as shown below, to let them know how easy it is to work with GIMP for common requirements of students.

Here are the easy steps to create one-
1. Install and start GIMP editor in your favourite operating system. This is fairly easy in case of OpenSolaris and Linux flavours like Ubuntu, Fedora etc.
2. File -> New -> Choose desired size ( default 640*400 works fine for me ), and click OK
Now a white background is visible in the Image window.

3. Select Blend Tool and Gradient as FG to BG. Then keeping the CTRL key pressed drag a line from top to bottom on the image and you shall find something like this -->
4. Select the Text tool from Toolbar or press 'T' key shortcut. and drag a bounding rectangle on the image at the position you want to place the text. This will open a text box popup, type in the de
 sired text here ( "I LOVE OPEN-SOURCE" in my case ). Check the "Use selected Font" option and select the desired font type ( Sans Bold in my case), size( 37 px in my case) and color ( Red in my case) from the drop down menu. This will create a new layer ( say Layer1 ), which will be listed in the Layers window and It will look like this now-->
5. Right click on the newly created layer with the name same as your text and select Duplicate Layer . This creates a duplicated layer ( say Layer2). Now with the original layer, Layer1 selected, go to
Filters -> Blur -> Gaussian Blur -> Select horizontal and vertical blur radius as anything between 12 px - 20px each. and click OK
6. Select Layer2 and choose Color as Green from the color chooser.

7. Select Filters-> Distorts -> Emboss -> select funtion as Emboss and Azimuth, Elevation and Depth to any suitable value ( 30, 45, 20 respectively in my case)
now this will look something like this->
8. Select Layer2 -> right click on it -> Duplicate Layer. This creates another duplicate layer of it ( say Layer3).
9. Now Select Layer3 -> Tools menu -> Transform Tools -
 > Flip Tool -> Select Flip type as Vertical and click on the text. This is invert the image.
Select the Move tool from the toolbar and position the vertically flipped text few pixels below the original text. It will look like this now--->
10. Select Layer3 -> right click on it -> Add Layer Mask -> select
 Transfer Layer's Alpha Channel -> click Add
11. Select Layer3 and then select Blend tool from the tool bar with Gradient as FG to transparent and using CTRL key draw a straight line from bottom to top anywhere in the image. This is make the reflection text only partially visible, like this->
12. Finally right click Layer3 -> Apply Layer Mask. This finishes our steps and we finally get the desired text, kept on a shiny table, and glowing in red light. Crop the image to remove unwanted space and thats all!

Hope you enjoyed the tutorial! Experiment and learn...
Subscribe to:
Posts (Atom)

